
BeeSpotter photo guide
Guide to photographing bees for BeeSpotter
First of all, please remember to include at least one photo of a bee in each posting; for us to be able to identify your bees, we need to see them! As for organizing you photos, please help us out, by doing a separate submission of your photograph(s) of each bee (PLEASE NOTE: submissions that do not meet this requirement will be deleted without comment or response). For example, if you go out BeeSpotting one day and you see two different bees, and you take one photograph of the first bee and three photos (which is fine!) of the second bee, then please do two separate submissions to BeeSpotter, the first submission containing one photo of bee #1, and the second submission containing three photos of bee #2. THANKS.
Along with each photograph, we need information specifying where, when, and by whom the photo was taken; also, if the bee is on a flower when photographed, and you know the identity of the flower, please include that information as well. For the location, please provide at least the county in Illinois in which the photo was taken; more specific information is preferred. In specifying when the photo was taken, the date (month, day, and year) is sufficient (make sure that it is the date on which the photo was taken, rather than the date on which it was submitted to BeeSpotter, if the two are different). If you want to include time of day when the photo was taken, that is also appropriate. Most digital cameras and other photographic devices automatically store all of this information with each photo, so that it is easy to retrieve (and provide to BeeSpotter), even if one has not recorded it separately in a retrieval system (e.g., field logbook) that is remote from the camera.
BeeSpotter is soliciting photographs of honey bee, Apis mellifera, plus the 11 bumble bee species (Bombus spp.) that occur in Illinois. Please do not post photos of (or including) man-made honey bee hives. BeeSpotter does not have the capacity at present to identify photographed bees of species other than the 12 that are specified immediately above. For more information on determining what is or isn't one of the bees that we are interested in having you photograph, please visit our "Biographies of Illinois bees" and our "What is and isn't a bee" pages.
As far as photography basics, a "good" photo of a bee is defined in the same way as a good photo of anything else. It should be in focus, and the subject should be adequately lighted, and large enough in the image, so that some detail can be seen. As regards good-quality bee photos in particular, the angle at which the bee is photographed can be important. The honey bee is recognizable at most angles. With bumble bees, however, the color characteristics that people need to see in order to identify the bees are more visible at some angles, less so at others. Specifically, these color characters are most readily seen when the bee is viewed in dorsal aspect (that is, when the viewer can see the entire upper side of the bee), preferably with the bee's wings spread out to either side so that they do not block the view of the upper side of the body (Fig. 1).
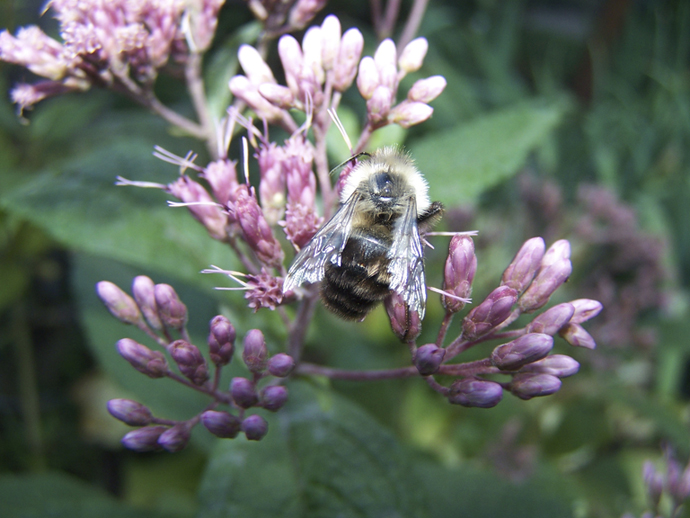
Figure 1. Bumble bee in dorsal view, with the wings spread apart to reveal the upper side of the abdomen; this is a good view for allowing identification of bumble bees (photo by Laura Rowan, BeeSpotter).
The goal in photographing a bumble bee, therefore, should be to show as much of the upper side of the body (especially the abdomen) as possible. Taking photos of the same bee from different angles also can be of help in identification. For example, if a bumble bee persistently keeps its wings folded over the body as you try to photograph it, a lateral (side) view might actually be better than a top view, in that it might show just enough of the abdominal markings to allow identification (Fig. 2).
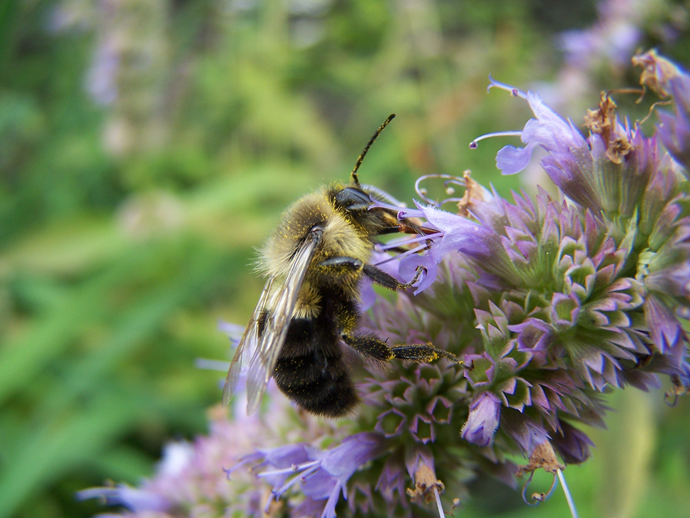
Figure 2. Bumble bee in lateral view; in cases in which the bee keeps its wings folded over the body, photographing it in side view can be helpful to the identifier, as at least some of the abdominal markings may be visible (photo by Laura Rowan, BeeSpotter).
Needless to say, bees that have landed on flowers, and thus are somewhat stationary, are easier to photograph than are bees in flight. Of course, some bees are not going to be so cooperative as to strike and hold the ideal pose, but by the same token, especially when they are on flowers, bees generally are fairly well preoccupied with their work, and it is often surprising how unconcerned they appear to be about being photographed, even when the camera is quite close to them. If a nectaring bee is perturbed by being photographed, it usually will simply fly away, rather than attacking the photographer. If, however, a bee should appear to become aggressive, the photographer should calmly move away from it, and the bee will either return to its business or fly away. Keep in mind that, in general, a bee will sting only if it perceives that its nest is being threatened, or if it is subjected to direct physical contact (especially that in which the bee is injured or restrained). The photographer will be most successful by approaching the subject with an outlook of confidence, common sense, and reasonable caution, but not fear.
We ask that you submit photos in full, off-the-camera size; i.e., please do not reduce them in size before submitting them, because the resulting loss of resolution could render the bee unidentifiable. On the other hand, cropping your full-size photos to include only the bee(s) and flower(s) is fine, and in fact we ask that you do so if possible, not only because it will save on server space here at BeeSpotter, but also because, by doing that, you often can create high-grade close-ups even if the bees were not photographed at close range (provided that the original images are of good quality), which in turn can increase the probability of our being able to identify the bees in your photos. Here is an example. The good-quality photo below (Fig. 3) was 2272x1704 pixels in its original, off-the-camera size. In order to fit it onto this page, it was greatly reduced in size, down to 690x518 pixels. Note that the bees take up only a small part of the picture.
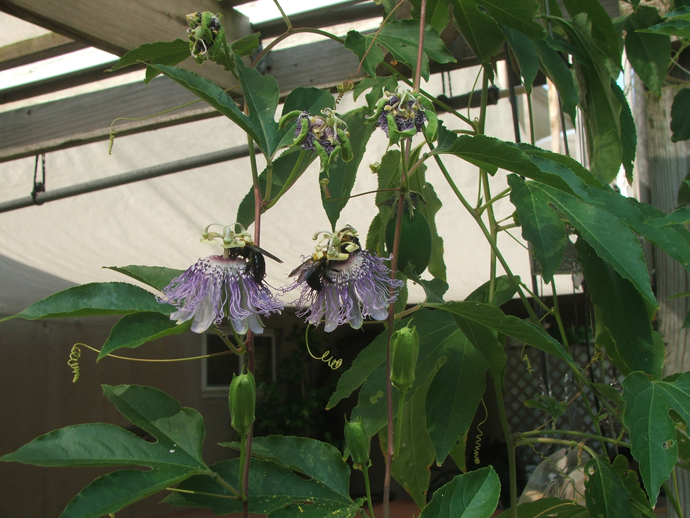
Figure 3. Bees on Passiflora flowers; entire image reduced from 2272x1704 pixels to 690x518 pixels; the image was not altered in any way other than resizing (photo by Diane Schmidt, BeeSpotter).
But if we start with the full-size photo and, rather than reducing the entire picture from 2272x1704 down to 690x518, we instead crop it down to where it is just a 690x518 area that includes the bees and the flowers, then this presents a photo that is the same size as Fig. 3, but now, because the 690x518 pixels were selected from a very large (off-the-camera) image that was a good-quality photo to begin with, the subjects of interest are seen in a nice close-up view (Fig. 4). So, the point is, if you have a photo in which the bee and flower take up only a small part of the picture, then if you can select (from the original, full-size image) only the area with the bee(s) and flower(s) in it, and post that to us, this can be a big help to the identifier. Thanks in advance to all BeeSpotters who can manage to do this!

Figure 4. Bees on Passiflora flowers; 690x518-pixel area, selected from the full-size photo, presents a nice close-up view of just the bees and the flowers; the image was not altered in any way other than cropping (photo by Diane Schmidt, BeeSpotter).
Back to the list of topics